transforming t-shirts into stylish headbands
Transforming T-Shirts into Stylish Headbands
Why Use T-Shirts for Headbands?
Repurposing old t-shirts into headbands is a creative and sustainable way to breathe new life into clothing that might otherwise be discarded. This eco-friendly practice not only reduces waste but also adds a personalized touch to your wardrobe. T-shirt fabric is typically soft, stretchy, and comfortable, making it an ideal material for headbands. Moreover, with a variety of colors, patterns, and designs available, you can easily create unique accessories to suit your personal style.
Materials Needed
Transforming a t-shirt into a headband requires few materials. Here’s what you’ll need:
- T-Shirt: Choose a t-shirt that is either too small, faded, or no longer to your liking. Look for stretchy fabrics to ensure comfort.
- Scissors: A good pair of fabric scissors will make all the difference in cutting smoothly.
- Measuring Tape: To measure the right length for your headband.
- Sewing Kit (Optional): If you prefer a more durable finish, have a needle and thread on hand. You can also use a sewing machine for quicker results.
- Fabric Pin or Clip (Optional): Keeps the fabric in place while you cut or sew.
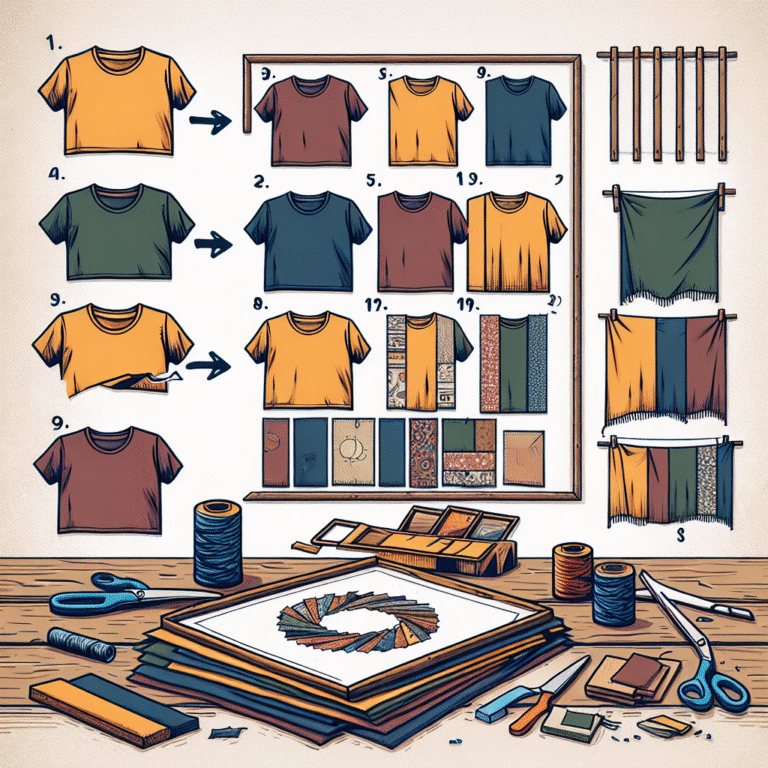
Different Styles of Headbands
There are various headband styles you can create from a t-shirt, giving you ample opportunities to express your creativity. Here are some popular types:
- Classic Wide Band: A simple, single piece of fabric that can be worn as a headband or a hair tie.
- Twisted Headband: This style incorporates a twist in the fabric that adds a fun and sporty touch.
- Knotted Headband: A chic option featuring a knot at the front, which can be adjusted based on your preferred fit.
- Braided Headband: For a more intricate design, three strips of fabric can be braided together.
- Elasticized Headband: Adding elastic to the back can provide extra stretch and a secure fit.
Step-by-Step Guide
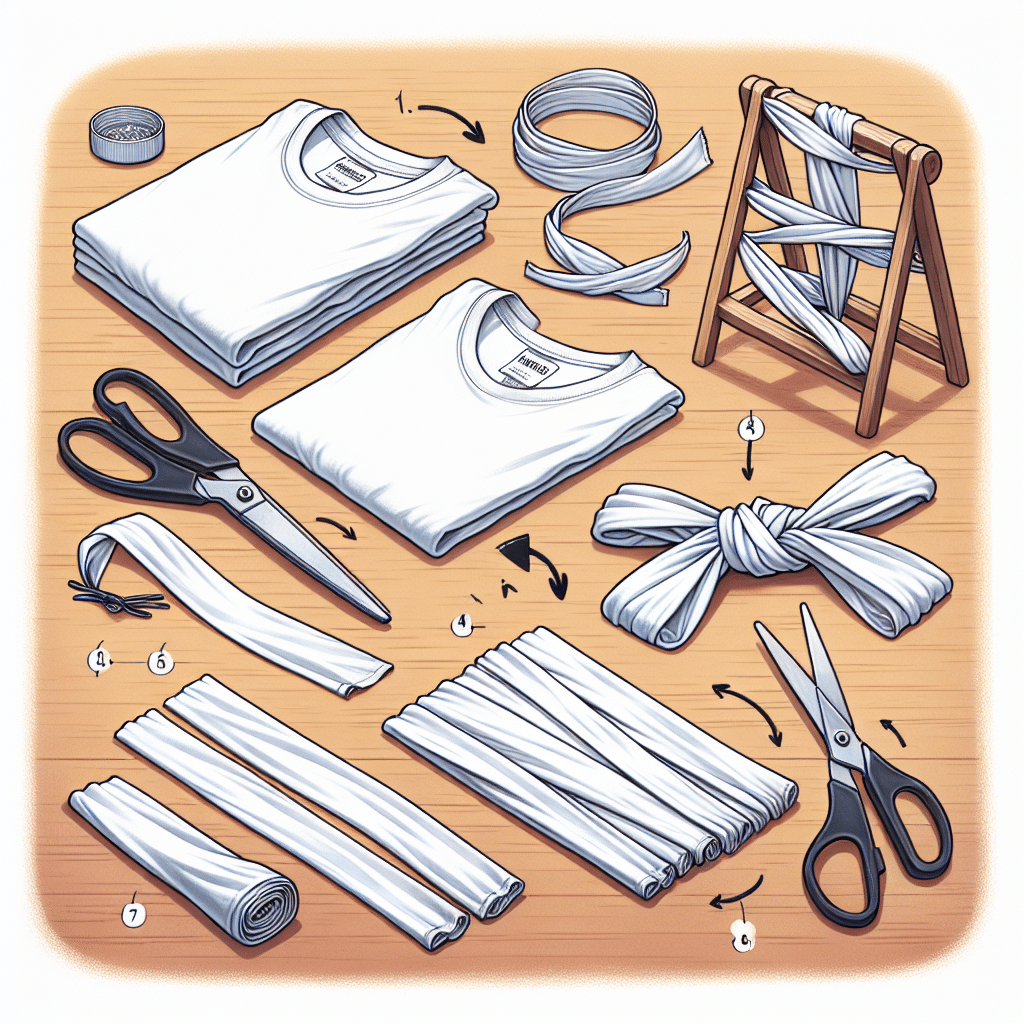
Step 1: Choosing the Right T-Shirt
Begin by selecting a t-shirt that matches your desired style. Consider factors such as color, print, and size. A larger shirt often provides more fabric for wider bands or different styles.
Step 2: Measuring and Cutting
-
Cutting the Band: Measure and mark about 4-6 inches in width for a standard headband. The length should be approximately 20-22 inches for a comfortable fit, but this can vary based on head size and style preference.
-
Cutting Methods: You can use the existing hem of the t-shirt to create a clean edge. Cut horizontally across the body of the shirt. Be sure to cut the fabric into a continuous loop or as a rectangular strip, depending on the desired style.
Step 3: Preparing the Fabric
-
Stretching: Gently pull at the fabric strips to help the edges curl slightly. This creates a more finished look and contributes to the fabric’s stretchiness.
-
Sewing (Optional): If you’d like to sew your headband, fold the strip in half and sew along the edge. Use a simple straight stitch or zigzag stitch to secure the ends. If you don’t have a sewing machine, hand-stitching works just as well.
Step 4: Creating Your Desired Style
For a Twisted Headband:
- Take your long strip and tie a knot in the middle.
- Fold in half, placing the knot at the center. You can adjust the tightness of the knot depending on your preference.
- The ends can be sewn or glued together for a secure hold.
For a Knotted Headband:
- Fold the strip in half, creating a loop.
- Tie a knot at the center, adjusting it to your preference.
- Secure the ends by either sewing them or using fabric glue.
For Braid:
- Cut three equally sized strips of fabric from your t-shirt.
- Braid the strips together tightly, finishing with a secure knot at both ends.
- Depending on the overall length, either sew or tie the ends securely.
Embellishing Your Headband
Once you have your basic headband style, consider enhancing it further. Here are some ideas:
- Adding Embroidery: Personalize your headband by stitching a simple design or monogram.
- Adding Beads or Charms: Weave beads into the fabric for a sparkling embellishment.
- Ribbons: Attach ribbons that can cascade down the back for a stylish flair.
- Fabric Paint: Consider using fabric paint to add patterns or designs to your new accessory. Make sure to let it dry completely before wearing.
Care Instructions
To maintain the quality and longevity of your t-shirt headband, keep the following care tips in mind:
- Hand Wash: Whenever possible, hand wash your headband with mild soap and cold water.
- Avoid Heat: Do not use a dryer as the heat may alter the shape. Instead, lay it flat to air dry.
- Store Properly: Avoid crumpling or placing heavy objects on the headband. Store it flat or hung up to maintain its shape.
Styling Tips
Now that you have your chic headband, here are some styling suggestions to make the most out of your creation:
- Casual Outfits: Pair your headband with casual attire like jeans and a tee for an effortlessly chic look.
- Workout Gear: A headband is perfect for keeping hair in place during workouts and adds an extra layer of style.
- Bohemian Style: Wear a colorful, braided headband with maxi dresses for a laid-back boho vibe.
- Beach Day: A stylish t-shirt headband can keep your hair away from your face during beach outings.
Resources for Inspiration
If you’re looking for more creative ideas, consider exploring platforms like Pinterest or Instagram. Search for hashtags such as #DIYHeadbands or #UpcycledFashion to discover a wealth of inspiration.
Final Thoughts
Transforming old t-shirts into stylish headbands is not only practical but also offers a unique opportunity to express your creativity. Enjoy the process of crafting, styling, and showcasing your customized accessories. Whether you’re a crafting novice or an experienced DIYer, this project can be both a fun and rewarding experience. Remember, the only limit is your imagination—so get creative and enjoy wearing your new headbands wherever you go!